Integrating Google Tag Manager into your WordPress website can greatly enhance your ability to manage and deploy marketing tags (such as tracking pixels, scripts, and analytics tags) without needing to modify your site’s code every time. This is a powerful tool for marketers and developers alike, as it allows for quicker deployment and testing of tags. Here’s a step-by-step guide on how to integrate into your WordPress website.
Step 1: Create a Google Tag Manager Account
- Sign Up for Google Tag Manager:
- Visit the Google Tag Manager website and sign in with your Google account.
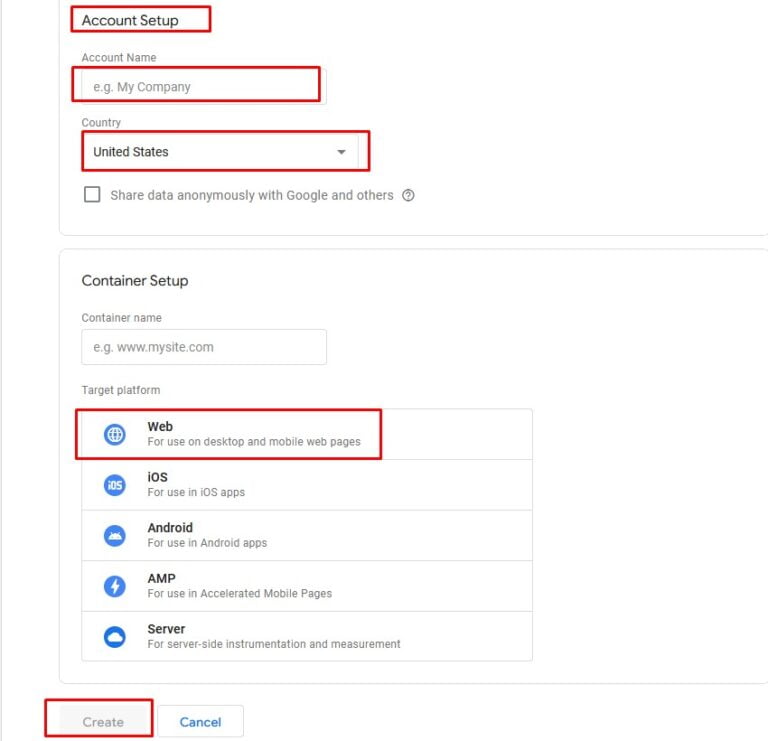
- Click on “Create Account” and fill in the necessary details like your Account Name and Container Setup. For the Container Setup, use your website’s domain name.
- Create a New Container:
- A container holds all the tags for your site. Name your container and choose the “Web” platform.
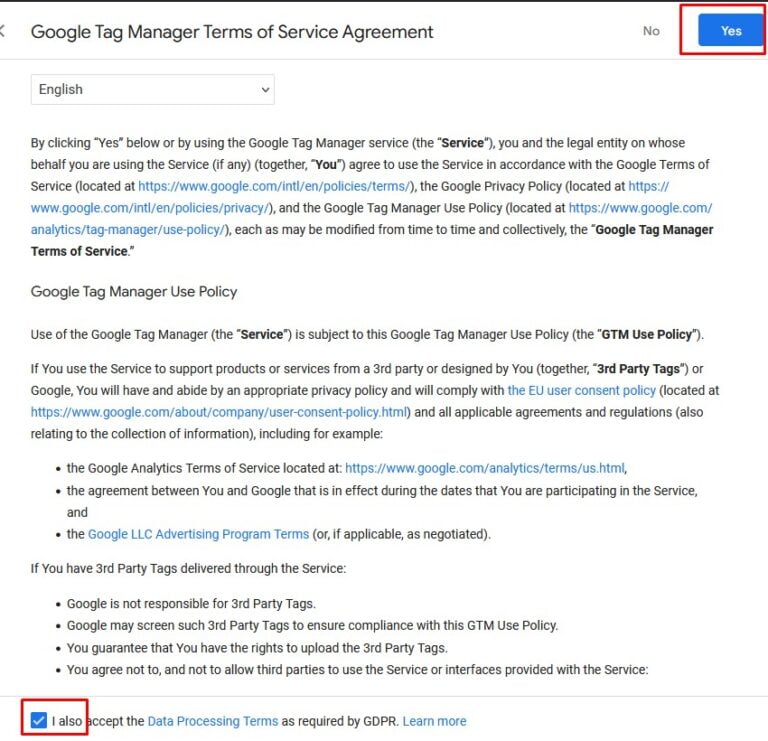
- Click “Create” and accept the GTM Terms of Service Agreement.
- Copy Your Container Code:
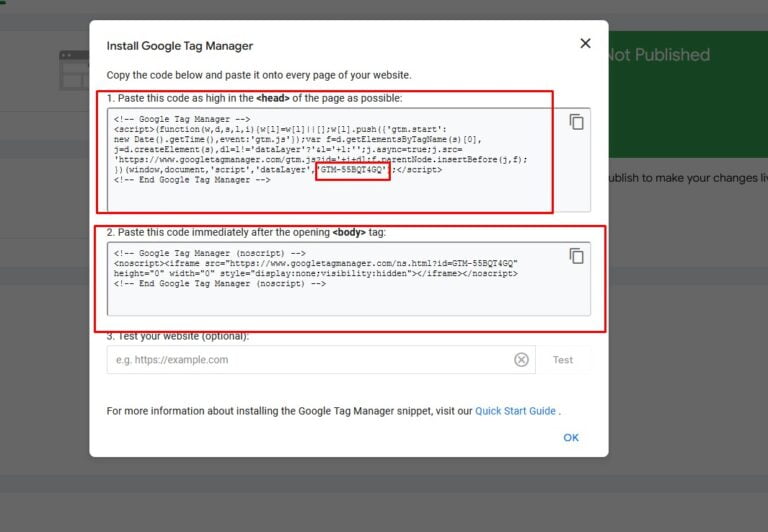
- After creating your container, you will be provided with two snippets of code (one for the <head> section and another for the <body> section of your website). Keep this window open or copy these snippets to a text editor for easy access.
Step 2:Setup Google Tag Manager on Your WordPress Website
There are two main methods to add GTM to your WordPress site: manually inserting the code or using a plugin.
Method 1: Manual Insertion
- Access Your Theme Files:
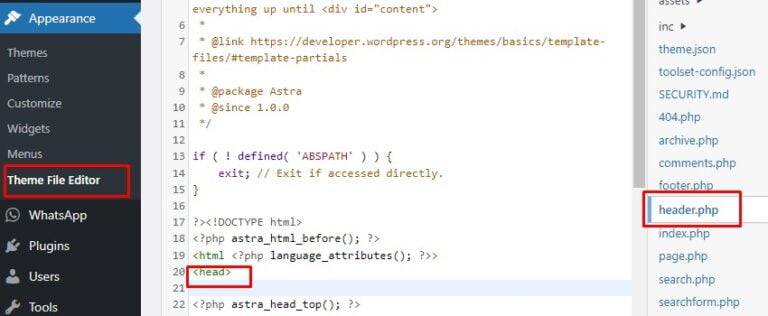
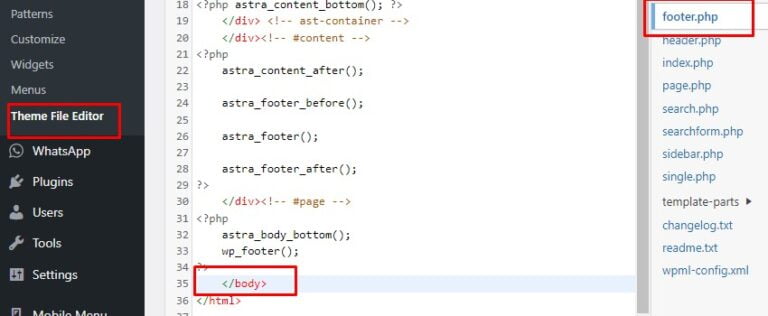
- Log into your WP dashboard and navigate to Appearance > Theme Editor. This will allow you to edit your theme’s files directly.
- Important: Before making any changes, it’s a good practice to create a child theme or backup your current theme to avoid losing any customizations in case of errors.
- Insert Code into the <head> and <body> Sections:
- Locate the header.php file and paste the first code snippet right after the <head> tag.
- Next, find the footer.php file and paste the second code snippet immediately after the opening <body> tag.
- Save the changes to your theme files.
- Or you can use header and footer code insertion plugins.
Method 2: Using a Plugin
Using a plugin is a safer and easier method, especially if you are not comfortable editing theme files directly.
- Install and Activate a Thomas Geiger`s GTM4WP Plugin:
- Go to Plugins > Add New in your wp dashboard.
- Search a plugin like “GTM4WP” by Thomas Geiger or another trusted plugin.
- Click “Install Now” and then “Activate” to enable the plugin.
- Configure the Plugin Settings:
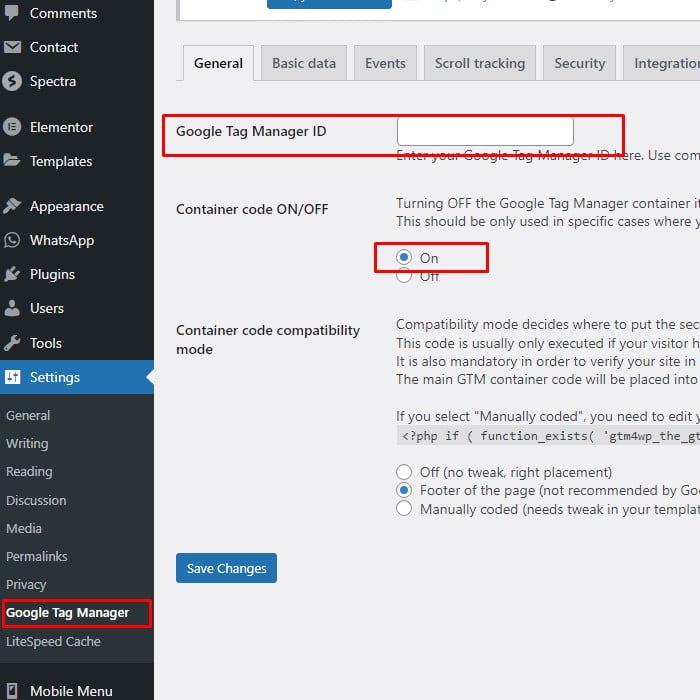
- Navigate to the plugin’s settings page, typically found under Settings > Google Tag Manager in your WordPress dashboard.
- Enter your GTM Container ID (which starts with “GTM-“) from the code snippets you copied earlier.
- The plugin will automatically insert the GTM code snippets in the correct locations within your theme.
Step 3: Verify Installation
- Preview and Debug Mode:
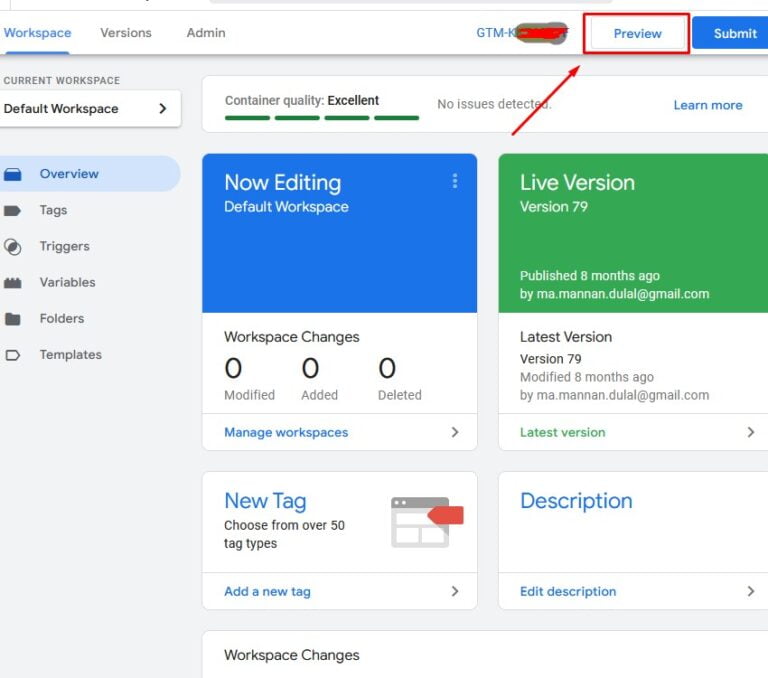
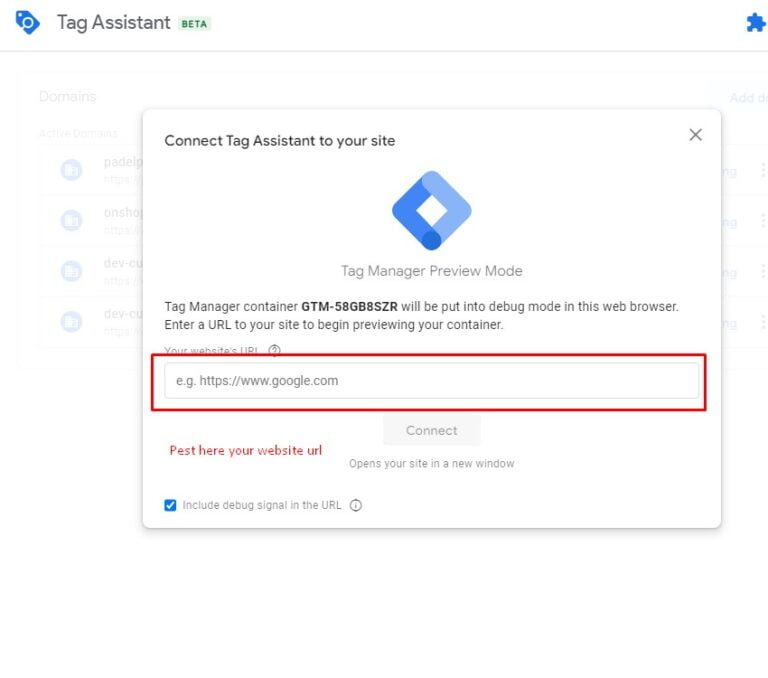
- Return to the Google Tag Manager dashboard and click on “Preview” to enable Debug mode.
- Open your WP site in a new browser tab. A debugging console should appear at the bottom of your website, indicating that Google Tag Manager is correctly installed.
- Use Google Tag Assistant:
- Install the Google Tag Assistant browser extension to check if the GTM container is firing properly. This tool will provide detailed information about the tags deployed on your website.
- Check for Errors:
- Ensure there are no errors in the console or issues reported by Google Tag Assistant. If you encounter any problems, double-check the GTM code placements or plugin configuration.
Step 4: Adding Tags, Triggers, and Variables
- Create a Tag:
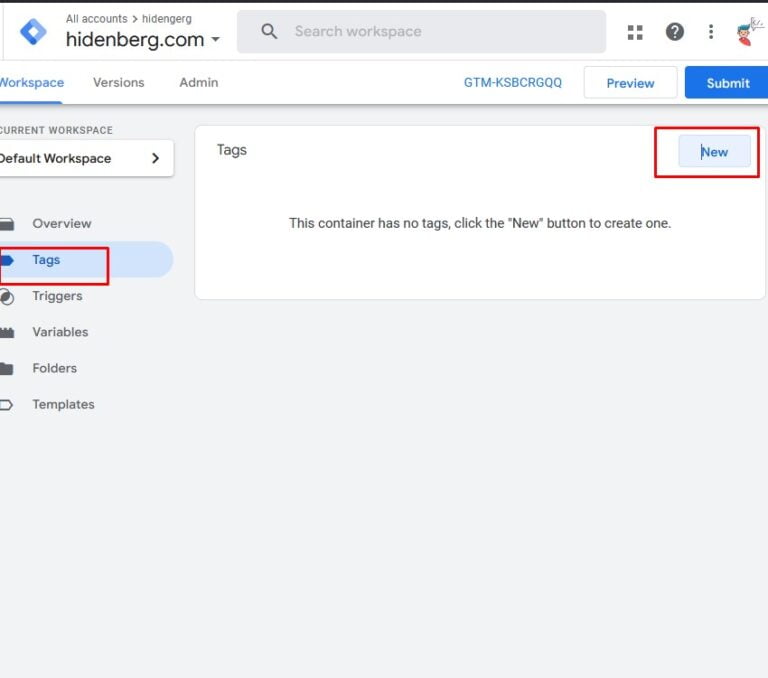
- In your GTM Dashboard, click on “Tags” in the left-hand menu and then click on “New.”
- Name your tag descriptively (e.g., “Google Analytics – Page View”).
- Click on “Tag Configuration” and select the type of tag you want to deploy (e.g., “Google Analytic 4s: Google Tag /GA4 Configuration”. We have discussed another blog).
- Set Up Triggers:
- After configuring your tag, you need to set up triggers that determine when your tag should fire.
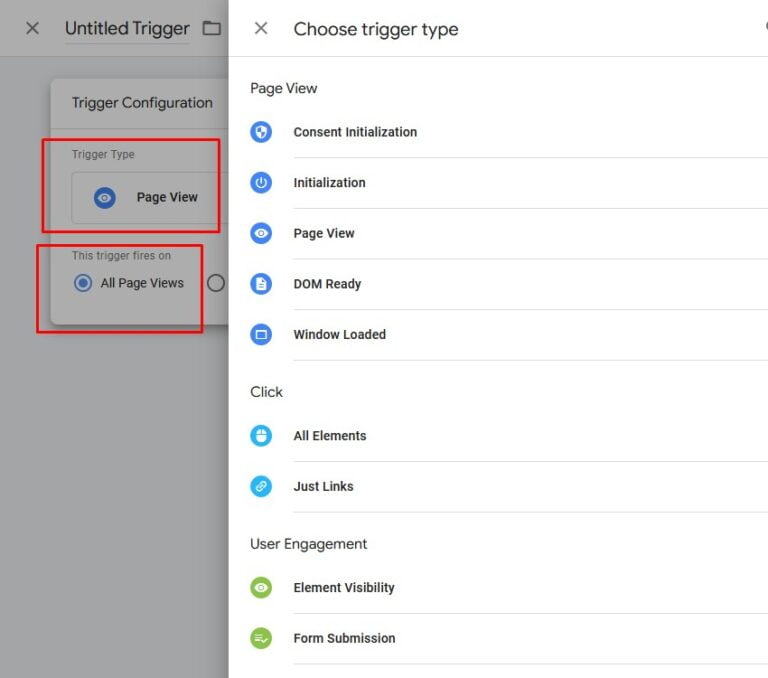
- Click on “Triggering” and choose a trigger from the list (e.g., “All Pages” for the Google Analytics tag to fire on every page view).
- Save and Publish:
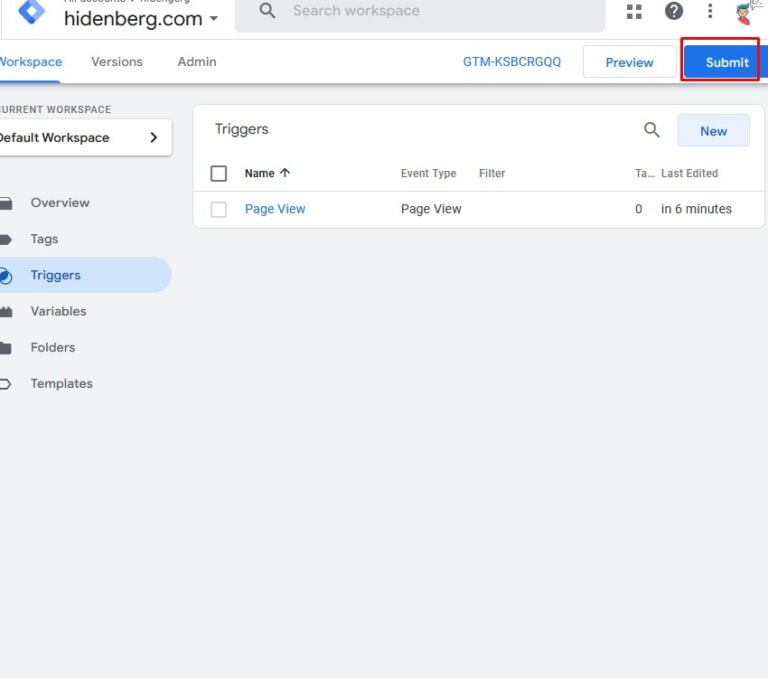
- Once your tag and triggers are configured, click “Save” and “Submit” to publish your changes.
- It’s crucial to name and describe your version when you publish changes, which helps you maintain a history of changes you made.
Step 5: Testing and Troubleshooting
- Test Your Tags:
- Before deploying your tags to the live website, it’s important to test them in the GTM Preview mode to ensure they’re firing correctly.
- Navigate your site and check the tags you configured are firing as expected.
- Review and Adjust:
- If tags are not firing or errors are present, revisit your setup in GTM to make necessary adjustments.
- Common issues might include incorrect trigger settings, missing variables, or misconfigured tags.
- Publish Your Container:
- Once all tags are tested and working correctly, click “Submit” in Google Tag Manager to publish your container.
By following these steps, you have successfully integrated Google Tag Manager with your WordPress website. This powerful tool will allow you to manage all your website tags from a single interface, enabling faster deployments and more robust analytics tracking. Remember to regularly review and update your tags, triggers, and variables to ensure tags are working optimally. Happy tagging!


Hello! Do you use Twitter? I’d like to follow you if that would be okay.
I’m definitely enjoying your blog and look forward to new updates.
Thank you. https://x.com/mannan_allen
Greetings! Very helpful advice in this particular article!
It is the little changes that will make the biggest changes.
Thanks for sharing!
Thank you
When I initially commented I seem to have clicked on the -Notify me when new comments are added- checkbox and now whenever a
comment is added I receive 4 emails with the same comment.
Perhaps there is a means you can remove me from that service?
Thank you!
Sorry, I can not understand your problem.
This website truly has all of the info I needed about this subject and didn’t know who to ask.
Thank you very much. If you have any questions, you can tell me on WhatsApp.
Everything is very open with a clear description of the issues.
It was definitely informative. Your site is useful.
Thanks for sharing!
Thank you
Hello, i think that i saw you visited my weblog thus i came to “return the favor”.I am attempting to find things to improve my site!I suppose
its ok to use a few of your ideas!!
Thanks a lot.
Hi, I do believe this is a great website. I stumbledupon it 😉
I will come back yet again since I book-marked it.
Money and freedom is the greatest way to change, may you be rich and continue
to guide others.
THANK YOU
Excellent post. I used to be checking continuously this blog and I’m impressed!
Extremely helpful information specifically the last section 🙂 I care
for such information a lot. I used to be looking for this certain information for a very long time.
Thanks and best of luck.
Thank You.
This paragraph presents clear idea for the new visitors of blogging,
that truly how to do running a blog.
It’s really a great and useful piece of info. I am happy that you just
shared this helpful info with us. Please keep us
up to date like this. Thank you for sharing.
Thanks for sharing your thoughts. I truly appreciate your efforts and I will be waiting for your further write ups thank you once again.
It is in point of fact a nice and useful piece of info.
I’m glad that you simply shared this useful info with us.
Please stay us informed like this. Thank you for sharing.
Your style is really unique in comparison to other people I’ve read stuff from.
Thank you for posting when you’ve got the opportunity, Guess I’ll
just book mark this site.
Hey there, I think your website might be having browser compatibility issues.
When I look at your blog site in Chrome, it looks fine but when opening in Internet Explorer, it has some overlapping.
I just wanted to give you a quick heads up!
Other then that, fantastic blog!
Hello my friend! I wish to say that this article is awesome, great written and come with approximately all important infos.
I’d like to look more posts like this .
When some one searches for his required thing, so he/she wants to be available that in detail, thus that thing is maintained over here.
Heya this is somewhat of off topic but I was wanting
to know if blogs use WYSIWYG editors or if you have to
manually code with HTML. I’m starting a blog soon but have no coding knowledge so I wanted to get
guidance from someone with experience. Any help would be enormously appreciated!
I loved as much as you will receive carried out right here.
The sketch is tasteful, your authored material stylish.
nonetheless, you command get bought an impatience over
that you wish be delivering the following. unwell unquestionably come
more formerly again as exactly the same nearly very often inside case you shield this increase.
Hello to every one, because I am really eager of reading this website’s post
to be updated regularly. It carries fastidious
material.
Heya! I just wanted to ask if you ever have any trouble with hackers?
My last blog (wordpress) was hacked and I ended up losing many months of hard work due to no backup.
Do you have any solutions to prevent hackers?
I savour, result in I found just what I was taking a look for.
You have ended my 4 day long hunt! God Bless you man. Have a great
day. Bye
Excellent article. I am dealing with some of these issues as well..
You can definitely see your expertise within the article you write.
The sector hopes for even more passionate writers such as you who are
not afraid to say how they believe. At all times follow your heart.
I was suggested this blog through my cousin. I am no longer certain whether or not this post is written by way of him as nobody else know such distinct approximately my difficulty.
You’re wonderful! Thank you!
I simply could not go away your website prior to suggesting
that I really loved the usual info an individual supply on your visitors?
Is gonna be again frequently in order to investigate cross-check new posts
Loved this article! Your perspective on this topic is refreshing.
I appreciate the insights you provided. Your analysis is spot on, Thanks for shedding light
on this issue; You’ve inspired me to learn more about this topic.
Your arguments are compelling and well-articulated.
Overall, This will surely spark some interesting conversations!
Thanks again for this valuable content!
My blog post Press release – idea.informer.com –
hello!,I like your writing very so much! percentage we keep
up a correspondence more about your article on AOL?
I require an expert in this area to unravel my problem.
May be that is you! Having a look forward to see you.
Thank you
Hi my family member! I want to say that this article is amazing, nice written and come with approximately all important infos.
I’d like to look extra posts like this .
Wow, awesome weblog format! How lengthy have you been running a blog for?
you made running a blog glance easy. The total glance of your website is
great, as neatly as the content!
I constantly emailed this web site post page to all
my associates, since if like to read it after that
my links will too.
It’s the best time to make some plans for the longer term and it’s time to be
happy. I have read this publish and if I may I want to
recommend you few interesting things or tips. Maybe you could write subsequent articles relating to this article.
I want to read more things approximately it!
Simply desire to say your article is as amazing. The clarity in your post is simply great
and i can assume you are an expert on this subject. Well with
your permission let me to grab your RSS feed to keep up to
date with forthcoming post. Thanks a million and
please carry on the enjoyable work.
Post writing is also a excitement, if you know after that you can write if not it is difficult to write.
You made certain nice points there. I did a search on the
topic and found nearly all people will agree with your blog.
Very good post. I’m going through some of these issues as well..
Nice post. I learn something new and challenging on websites I stumbleupon on a daily
basis. It will always be helpful to read through content from other authors and use a little something from their sites.
These are really enormous ideas in about blogging. You have touched some
nice points here. Any way keep up wrinting.
Hi there, this weekend is nice in support of me, for the reason that this
occasion i am reading this enormous educational piece of
writing here at my house.
Very descriptive post, I liked that a lot. Will there be a part 2?
There’s definately a great deal to find out about this subject.
I really like all the points you made.
You on the homepage of digg or reddit or some other major web page?
Cause your hosting is Seriously sluggish suitable now, atleast for me.
I have read some just right stuff here. Certainly value bookmarking for revisiting.
I wonder how a lot effort you set to create any such
excellent informative website.
Thanks in support of sharing such a good thinking, post is
good, thats why i have read it completely
WOW just what I was searching for. Came here by searching for dâm tặc
We stumbled over here different web page and thought I might as well check things out.
I like what I see so i am just following you. Look forward to looking into your web page repeatedly.
Whats up are using WordPress for your site platform? I’m new to the blog
world but I’m trying to get started and create my own. Do you
need any html coding expertise to make your own blog?
Any help would be greatly appreciated!
Good day! This is my 1st comment here so I just wanted to give a quick shout out and tell you I genuinely enjoy reading through your
blog posts. Can you recommend any other blogs/websites/forums that deal with the same
topics? Thanks a ton!
It’s a shame you don’t have a donate button! I’d most
certainly donate to this outstanding blog! I suppose for now
i’ll settle for book-marking and adding your RSS feed to my Google
account. I look forward to brand new updates and will talk about
this website with my Facebook group. Chat soon!
Quality posts is the main to invite the viewers to go
to see the website, that’s what this website is providing.
Generally I don’t read post on blogs, however I would like to say
that this write-up very compelled me to check out and do it!
Your writing taste has been surprised me. Thank you, quite
great post.
This is my first time go to see at here and i am
really pleassant to read all at single place.
Hi there everybody, here every one is sharing these experience,
so it’s nice to read this webpage, and I used to pay a visit this blog everyday.
great publish, very informative. I ponder why the other
specialists of this sector don’t understand this.
You should continue your writing. I’m confident, you have a
huge readers’ base already!
Hey would you mind letting me know which web
host you’re utilizing? I’ve loaded your blog in 3
completely different browsers and I must say this blog loads a lot quicker then most.
Can you recommend a good hosting provider at a fair price?
Thank you, I appreciate it!
Aw, this was an incredibly good post. Taking a few minutes and actual effort to
generate a very good article… but what can I say… I hesitate a lot and never manage to get anything done.
It’s a pity you don’t have a donate button! I’d definitely
donate to this fantastic blog! I suppose for now i’ll settle for
bookmarking and adding your RSS feed to my Google account.
I look forward to brand new updates and will share this blog
with my Facebook group. Chat soon!
Hello there! I could have sworn I’ve been to this website before but after reading through
some of the post I realized it’s new to me. Nonetheless, I’m definitely happy I
found it and I’ll be book-marking and checking back
frequently!
You have made some good points there. I checked on the net to find out more about the issue
and found most people will go along with your views on this website.
Way cool! Some extremely valid points! I appreciate you penning this article and the
rest of the site is extremely good.
Greetings from Los angeles! I’m bored at work so I decided to check out your site on my
iphone during lunch break. I really like the info you present here and can’t
wait to take a look when I get home. I’m shocked at how quick your blog
loaded on my phone .. I’m not even using WIFI, just 3G ..
Anyhow, good site!
Pretty section of content. I just stumbled upon your blog and
in accession capital to assert that I get actually enjoyed account your blog posts.
Anyway I will be subscribing to your augment and even I achievement you access consistently rapidly.
Hello, yeah this paragraph is actually fastidious and I have learned lot of things from it regarding blogging.
thanks.
Thanks for every other informative blog.
Where else may I get that type of information written in such an ideal
approach? I have a project that I’m just now operating on, and I have been on the look out for such information.
My relatives all the time say that I am wasting my time here at
web, however I know I am getting knowledge every day by reading such nice posts.
Hi there! This article could not be written any better!
Going through this post reminds me of my previous roommate!
He constantly kept talking about this. I most certainly will send
this post to him. Fairly certain he’ll have a good
read. I appreciate you for sharing!
Your means of explaining all in this post is
really nice, every one be capable of simply be aware of it, Thanks a lot.
Excellent blog! Do you have any tips for aspiring writers?
I’m planning to start my own website soon but I’m a little lost on everything.
Would you advise starting with a free platform like WordPress or
go for a paid option? There are so many choices out there that I’m totally confused
.. Any tips? Cheers!
I’m really impressed together with your writing talents and also with the layout in your
weblog. Is that this a paid theme or did you modify it
your self? Anyway keep up the nice quality writing, it’s uncommon to peer a nice blog like this one nowadays.
HeyGen!